Fluids, Filters, and Fire Extinguishers: The Day 1 Safety Checklist
📌 Key Takeaways
Your first 30 minutes with a classic car should focus on finding safety risks before you turn the key.
- Smell Before Starting: Raw gasoline odor means stop immediately—fuel leaks cause most classic car fires, and they often announce themselves before becoming dangerous.
- Fire Extinguisher First: Mount a clean-agent extinguisher within reach from the driver's seat on Day 1—standard dry chemical types damage vintage wiring and paint.
- Check Tire Age, Not Just Tread: Find the four-digit DOT code on the sidewall—tires over six years old may look fine but can fail without warning.
- Sitting Hurts More Than Driving: Rubber hoses, seals, and brake lines dry out and crack when cars sit for years, so treat every rubber part as suspect until inspected.
- Book a Baseline Inspection: A professional check within 30 days turns seller promises into verified facts and creates your true starting point for ownership.
Safety first, reliability second, cosmetics last—resist upgrades until the car runs right.
Classic VW and Porsche owners bringing home their first vintage vehicle will find a clear 30-minute checklist here, preparing them for the detailed inspection guide that follows.
~ ~ ~ ~ ~ ~ ~ ~ ~ ~ ~ ~ ~ ~ ~ ~ ~ ~ ~ ~ ~ ~ ~ ~ ~ ~ ~ ~ ~ ~ ~ ~ ~ ~ ~ ~ ~ ~ ~ ~ ~ ~ ~ ~ ~ ~ ~ ~ ~ ~ ~ ~
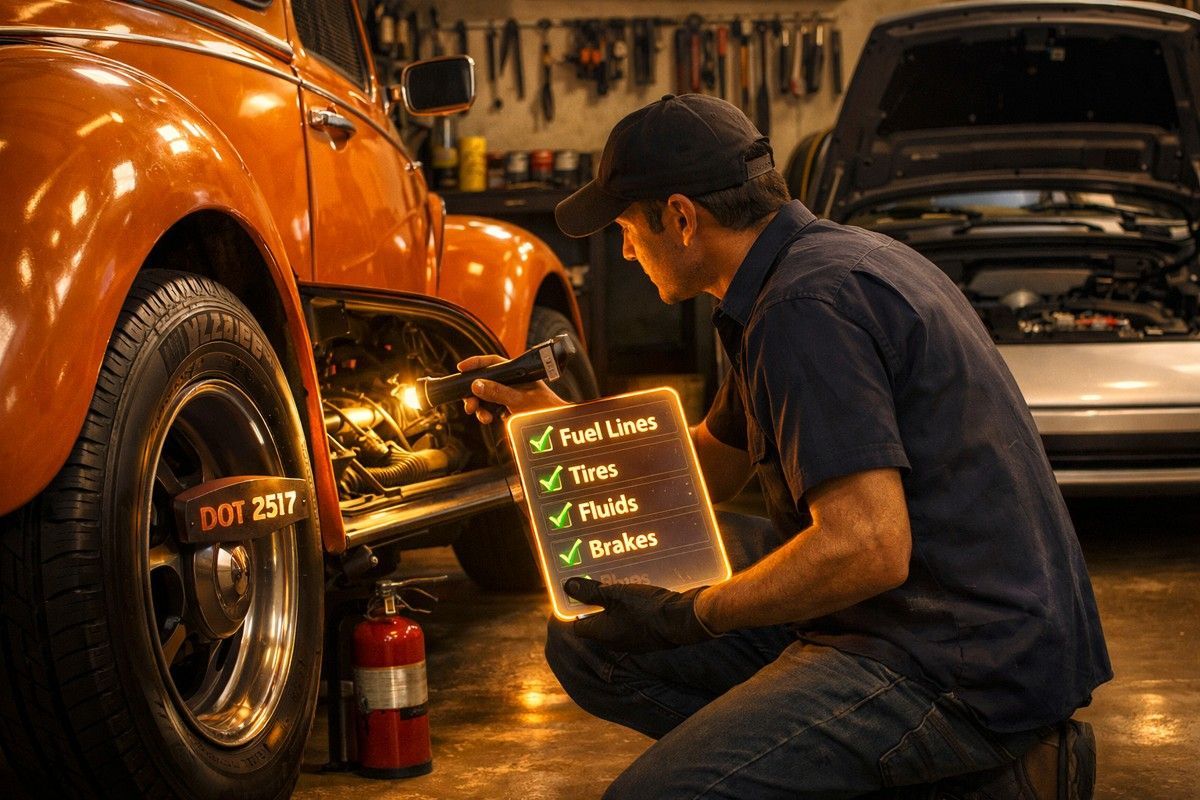
The garage door closes behind you. There it sits—your classic VW or Porsche, finally home. The excitement is real. So is the uncertainty.
Classic cars communicate the old-fashioned way—through smells, sounds, and leaks you have to learn to read. A fuel line might have been seeping for months. The tires might be older than they look. The only way to know is to check. Day 1 is about removing those unknowns fast, before you turn the key and hope for the best.
This checklist takes about 30 minutes. It won't make you a mechanic. It will help you spot the biggest risks, know when to stop, and understand exactly when to book a professional inspection.
The 2-Minute Rule (Before You Even Start It)
Before you touch the ignition, take two minutes to scan.
Walk around the car. Look underneath for fresh puddles or wet spots on the concrete. Open the engine compartment and breathe. What do you smell? Oil? Coolant? Nothing unusual?
Stop. Do not start the car if you smell raw gasoline. Ventilate the garage immediately and call a shop. Fuel leaks in air-cooled engines are the number one fire risk on Day 1, and they're more common than most new owners expect.
If everything smells normal and the floor is dry, you can proceed.
Step 1 — Put a Fire Extinguisher in the Car (Today)
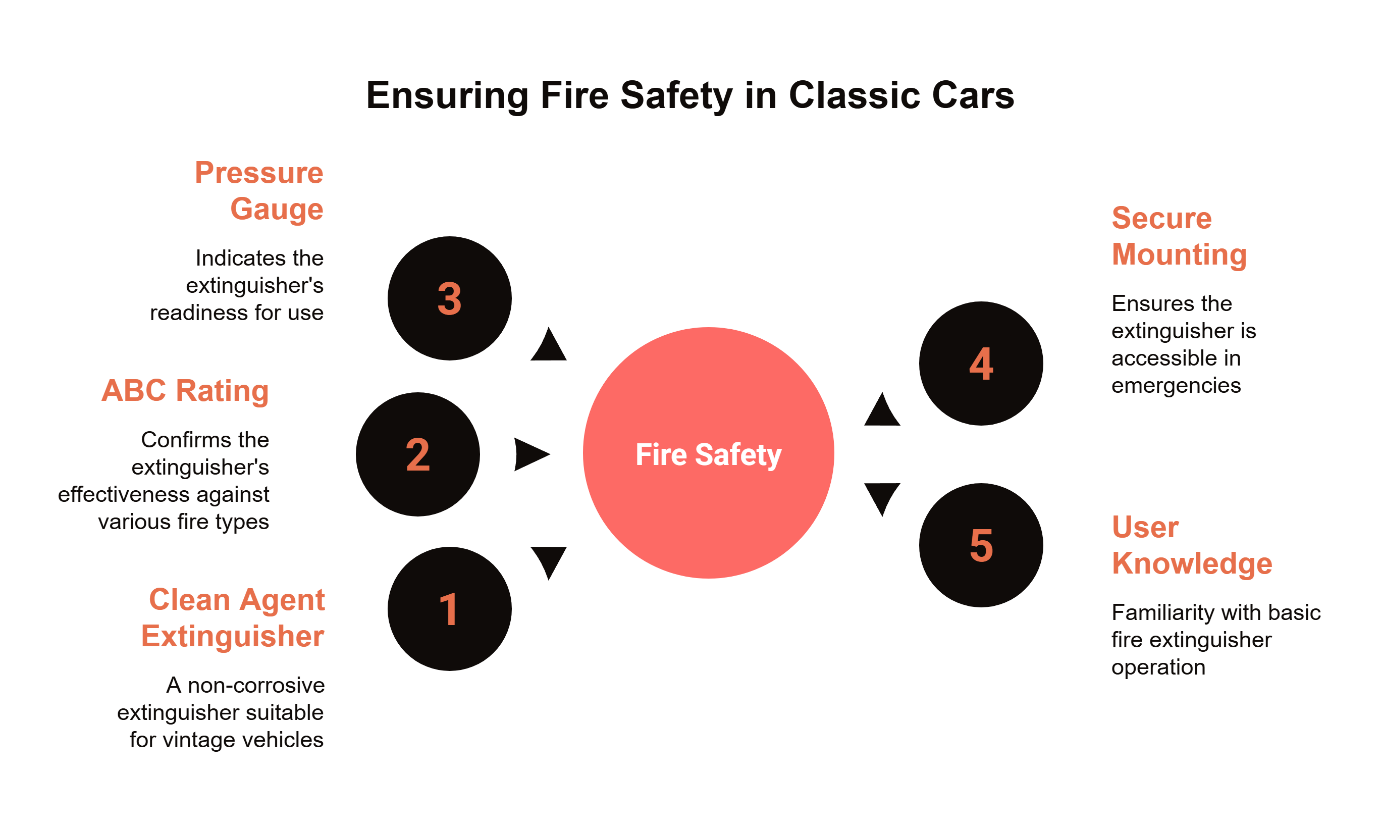
This is not optional for air-cooled classics.
A 'clean agent' fire extinguisher is generally what you need. While standard dry chemical extinguishers handle the right fire classes (A covers ordinary combustibles like upholstery, B covers flammable liquids like gasoline and oil, and C covers electrical fires), their powder is highly corrosive to vintage wiring, aluminum, and paint. Classic car experts typically recommend clean agent extinguishers (such as HalGuard) because they stop fires effectively without leaving a destructive residue. A 2.5-pound unit fits most classic cars without taking up much space.
When purchasing, look for a legitimate certification mark from a recognized safety testing organization. Counterfeit extinguishers with fake safety marks do exist—UL Solutions has issued warnings about this problem—so buy from a reputable retailer.
Mount it where you can reach it from the driver's seat, not loose in the trunk where it's useless in an emergency. Check that the pressure gauge reads in the green zone.
Quick checklist:
- ABC rating confirmed
- Pressure gauge in green
- Mounted securely within reach
- You know the basics: Pull, Aim, Squeeze, Sweep
Step 2 — The "Sniff + Look" Fuel Check
Fuel system issues cause most classic car fires. The good news: they usually announce themselves before they become dangerous.
With the car parked on a clean, dry surface, crouch down and look underneath. Any wet spots near fuel lines or the tank? Any drips? Now open the engine bay and smell again. Raw fuel odor—even faint—means something needs attention.
Here's the rule: if anything looks questionable, don't tighten fittings yourself and hope it holds. Fuel systems on classics can be brittle, and well-intentioned adjustments sometimes make things worse. Book an inspection and let someone verify the entire system.
Step 3 — Fluids You Can Verify Without Tools
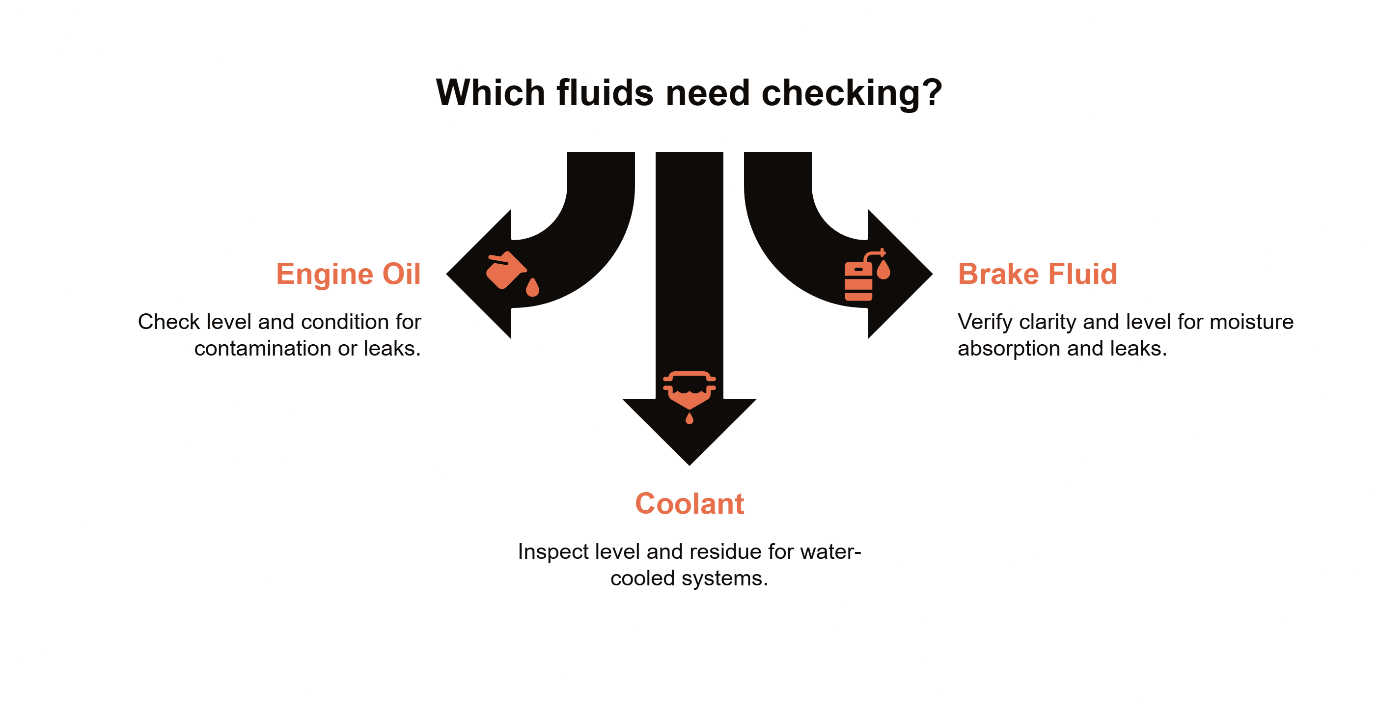
Engine Oil
Pull the dipstick and check two things: level and condition.
The level should fall between the min and max marks. Condition matters more than most sellers admit. Healthy oil looks amber to dark brown. If it's milky, there may be coolant contamination. Metallic sparkle means metal particles—bad news. If the oil smells like gasoline, the fuel system may be leaking internally.
Don't trust "freshly serviced" claims from the previous owner. Verify it yourself. If you don't know when the oil was last changed, change it now—this is the single easiest way to start fresh. The standard interval for a classic VW or Porsche is 5,000 miles or 12 months, whichever comes first.
Brake Fluid
Locate the brake fluid reservoir (usually near the firewall). The fluid should be clear to light amber. Very dark fluid suggests it hasn't been changed in years and has absorbed moisture, which lowers its boiling point and compromises braking.
If the level is low, or you notice dampness anywhere near the wheels or brake lines, that's an urgent inspection item.
Coolant (Water-Cooled Porsches Only)
If your Porsche has a liquid cooling system, check the reservoir level and look for any green or orange residue around hoses and fittings. Most air-cooled VWs and older Porsches don't have coolant systems, so skip this step if it doesn't apply.
Step 4 — Tires: Find the Date Code and Make the Call
Tread depth tells you how much rubber is left. It tells you nothing about how old that rubber is.
Every tire has a DOT code stamped on the sidewall. The last four digits indicate the week and year of manufacture. For example, "2419" means the tire was made in the 24th week of 2019. Goodyear provides a helpful guide for locating and reading this code.
Why does age matter? Rubber compounds degrade over time, even on tires that look fine and have plenty of tread. According to NHTSA, tire aging is a real safety factor that isn't always visible. The NTSB has also documented how aged tires can fail catastrophically without warning.
For a classic with unknown storage history, here's a conservative rule: if the tires are six years old or older, treat replacement as a near-term safety priority. Many manufacturers recommend inspection after five years and replacement by ten years regardless of appearance. When you don't know how the car was stored, err on the side of caution.
Step 5 — Filters: The "Unknown History" Trap
Filters are cheap. Engines are not.
If you can access the air filter housing easily, take a look. A dirty, clogged filter restricts airflow and affects performance. If it's visibly fouled, that's a data point about how the car was maintained.
Fuel filters are harder to assess without getting underneath the car, and their condition matters enormously on a classic. If you don't know when the fuel filter was last changed—or where it's even located—add it to the inspection list. Old fuel filters can shed debris into carburetors and fuel injection systems, causing problems that are expensive to diagnose.
One thing many new owners miss: sitting can be harder on a classic than driving. Rubber hoses, seals, and gaskets dry out and crack when a car sits for extended periods. Fuel hoses become brittle. Brake lines develop internal swelling. Vacuum lines crack. If the car was "barn-found" or sat for years before you bought it, every rubber component is suspect until inspected.
Step 6 — Your First Short Drive: What to Listen, Smell, and Watch For
Once you've completed the stationary checks, take a short drive around the block. Keep the windows down. Stay alert.
Listen for: grinding when braking, knocking from the engine, clunking over bumps, squealing belts.
Smell for: burning oil, hot coolant (if applicable), anything electrical or acrid.
Watch the gauges: oil pressure, oil temperature, and if your classic has an ammeter or voltmeter, pay attention to charging behavior while driving. The gauge should show the system charging, not draining. A weak charging system will leave you stranded at the worst possible moment.
Stop-Driving Triggers
If you notice any of the following, stop driving immediately and have the car inspected before continuing:
- Raw fuel smell in the cabin or engine bay
- Burning electrical smell (hot plastic or melting insulation)
- Soft or sinking brake pedal that fades under sustained pressure
- Sudden new leak that was not present before (especially if you see fluid pooling rapidly)
- Overheating behavior—for water-cooled Porsches: temperature gauge climbing, steam, coolant smell; for air-cooled VWs and Porsches: oil temperature spiking, sluggish performance, or the smell of burning oil, especially in heavy stop-and-go traffic
- Steering that suddenly feels loose or unresponsive
A short test drive reveals problems that sitting still never will. Trust your senses.
Prioritizing What You Find
By now, you probably have a mental list of everything that needs attention. The challenge is not identifying issues—it's prioritizing them so you don't go broke fixing everything at once.
Safety comes first. Brakes, steering, fuel system integrity, tire condition, and wiring all fall into this category. If something here is wrong, don't drive until it's resolved.
Reliability comes second: charging system health, cooling behavior, ignition, and fuel delivery. These issues will strand you, so address them within your first 30 days.
Drivability concerns—rough idle, hesitation, minor oil seeps—affect your enjoyment but won't leave you on the side of the road. Schedule them when convenient.
Cosmetics come last. Paint touch-ups, interior wear, and stereo upgrades do not affect function.
Resist the urge to install new wheels or upgrade the interior until the car is mechanically sound. A beautiful classic that leaves you stranded is not enjoyable to own.
Step 7 — Book the Baseline (Turning Day 1 Into Year 1 Confidence)
Book a professional baseline inspection within your first 30 days. This is not a quick oil change—it's a comprehensive evaluation of the car's current condition that transforms seller promises into verified facts.
Think of it as resetting the clock. The previous owner's maintenance records—if they exist—tell you what someone said was done. A thorough inspection tells you what's actually true right now. That's the foundation for the next year of confident ownership.
What to Ask For
When you schedule a baseline inspection, the shop should evaluate:
Safety systems. Brakes (including wheel cylinders, brake lines, and pad or shoe condition), steering components (tie rods, ball joints, steering box), and suspension (shocks, bushings, alignment).
Fuel system condition. Fuel lines (especially rubber sections near the engine), fuel filter, carburetor or fuel injection condition, and fuel tank for rust or contamination.
Wiring audit. A visual inspection of the electrical system looking for non-original modifications, damaged insulation, improper grounds, and fire hazards.
Fluid condition verification. Engine oil, transmission fluid, brake fluid, and coolant (if applicable)—checking not just levels but condition.
Road test notes. A test drive by an experienced technician who documents sounds, vibrations, and drivability concerns. This is where decades of experience matter. Someone who has worked on classic VWs and Porsches for years will notice things a general mechanic might miss.
What to Expect from a Trustworthy Shop
Ask for a clear, prioritized list—not a scare sheet of everything that could be wrong, but an honest assessment of what needs attention now versus what can wait. Good shops help you pace the spend. They understand that a classic car is a long-term relationship, not a one-time transaction. The goal is to get the car safe and reliable first, then address comfort and cosmetics as your budget allows.
California law requires repair shops to provide written estimates before performing work, and the California Bureau of Automotive Repair offers consumer guidance on what to expect from this process. You should never feel pressured to approve repairs on the spot. If a shop cannot explain why something is urgent in plain language, that's a warning sign.
This matters especially for drivers in Orange, Tustin, Anaheim, Yorba Linda, and Villa Park, where summer heat and stop-and-go traffic stress cooling systems, brakes, and fuel delivery in ways that gentle weekend drives don't reveal.
Orange Independent Auto Repair has been family-owned since 1971, with mechanics who specialize in classic VW and Porsche maintenance. If you're ready to turn Day 1 into Year 1 confidence, give us a call at (714) 633-7161 or schedule your baseline inspection online.
One Last Thing: Start a Maintenance Log
Write down what you verify and when. Even a notebook in the glovebox works. Record the date, the mileage, and what you checked or changed. This log becomes your proof of ownership stewardship—and your reference when something changes later. The habits built on Day 1 carry forward into Year 1 and beyond.
This checklist provides general guidance for new classic car owners. It is not a substitute for professional inspection. If you have any doubt about your vehicle's safety, consult a qualified mechanic before driving.
Our Editorial Process:
Orange Independent Auto Repair's editorial process is rooted in providing accurate, helpful, and easy-to-understand information. Each piece is reviewed by our experienced team to ensure clarity and usefulness for readers, whether you're looking for general guidance or exploring service options.
By: Orange Independent Auto Repair Insights Team